|
Advanced tables in HTML
Per request I created this tutorial showing you how to create tables,
like on my homepage.

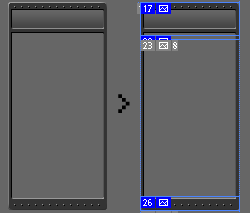
1, First load up PhotoShop and create the outline of the table.
Once done, open your table in Adobe ImageReady, and slice the picture
into several pieces as shown belown.

2, You will need a top secion, the bottom section,
and split the middle section into 2 slices,
one which has a height of 1-5px.
Save the top, bottom and the small middle piece.
3, After you saved the 3 slices you should have 3
files. Label them: top.gif, bg.gif and bot.gif (I assume that you
saved them as gif's). The last image you need now, is a spacer image.
Create an image sized 1x1. Which is completely transparent. Save
it as gif.
 |
 |
 |
 |
|
top.gif
|
bg.gif
|
bot.gif
|
spacer.gif
|
4,Now the graphix part is done, we now have to start
coding.
The below code is optimied for netscape/mozilla browsers
and internet explorer.
Netscape is one of the reasons why you need the spacer.gif file.
If you are sure your viewers are only using internet explorer (for
example on an intranet), you can remove the additonal table and
spacer.
Otherwise just add your images, and change the sizes of the tables
and rows.
<table width="99" border="0"
cellspacing="0" cellpadding="0" align="center">
<tr>
<td width="99" height="33" background="top.gif"
class="title">
<div align="center">top.gif</div>
</td>
</tr>
<tr>
<td background="bg.gif">
<table width="88" border="0" cellspacing="0"
cellpadding="0" align="center" background="spacer.gif">
<tr>
<td height="8"> <div align="center">bg.gif</div></td>
</tr>
</table>
</td>
</tr>
<tr>
<td><img src="bot.gif" width="99"
height="14"></td>
</tr>
</table> |
5, The final result
|
top.gif
|
|
|
 |
If you have any quesions, comments, or concerns
drop me a line
|